Warning: Undefined array key "width" in
/home/fivegall/public_html/wp-includes/media.php on line
1685
Warning: Undefined array key "height" in
/home/fivegall/public_html/wp-includes/media.php on line
1686
Warning: Undefined array key "width" in
/home/fivegall/public_html/wp-includes/media.php on line
1685
Warning: Undefined array key "height" in
/home/fivegall/public_html/wp-includes/media.php on line
1686
Warning: Undefined array key "width" in
/home/fivegall/public_html/wp-includes/media.php on line
1685
Warning: Undefined array key "height" in
/home/fivegall/public_html/wp-includes/media.php on line
1686
Article Contents
(Click to zoom to that part of the page)

Best Commercial Chicken Feeders
These are 3 chicken feeders we have used and recommend.
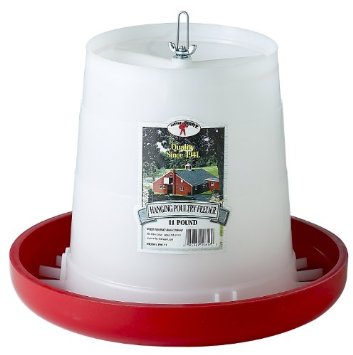
Hanging 17″ Galvanized Feeder
 We like our feeders as large as possible, so we don’t have to go out as often to fill up chicken food. Before we built our 5 gallon bucket feeder, we used one like this for 20 Rhode Island Reds. We filled it every couple days. Unlike our metal chicken waterer, it never west rusty but when we switched to a more crumbly organic feed it didn’t flow as well. This feeder doesn’t come with a cover, which is highly recommended if your birds roost above their food.
Find on Amazon >>
Plastic Enclosed Feeder
 When we only had 4 birds we used a smaller plastic feeder like this one which worked great. It keeps the food enclosed so they can’t poop on it. If they made a larger version we would have gone with that instead of the metal cylinder.
Find on Amazon >>
Mason Jar Chick Feeder
 This is the best feeder for chicks. It’s cheap and has rounded corners so those little chicken babies don’t hurt themselves. We used a narrow mouth mason jar which seemed to fit great. When refilling, just dump all the leftover chicken feed back out into your supply before screwing it back on, or you’ll get feed everywhere. Chicks are hungry so you’ll be refilling this often until they grow up enough to use the adult bird feeders.
Find on Amazon >>
Make your own 5 Gallon Bucket Chicken Feeder
I made this feeder because our old metal feeder didn’t flow well using organic feed, which was for some reason was very crumbly and would clump much more. Instead of trying to punch bigger holes in the metal feeder, I built this one from scratch. An important side benefit for us is that this new feeder is gigantic! We fill the feeder up much less now than we used to. Total cost for this project was less than 10 dollars.

The 5 gallon bucket feeder is much easier to make than our 5 gallon bucket waterer, because you don’t need to seal everything to create a vacuum inside the container.
Benefits of this Feeder over commercial feeders we have tried:
- A tiny fraction of the price
- Twice the capacity
- Won’t rust
- Hole can be enlarged for different feed types
- See the feed level at a glance
Ingredients
You will need:
- 5 gallon bucket (lid is optional)
- Nuts and bolts (I use these stove bolts)
- Plastic saucer with vertical sides (14″ seems good)
You want a saucer with vertical sides because otherwise chickens will scratch their food all over the place; scratching is how they find food in the wild.
The saucer I’m using isn’t completely vertical, but it is close enough to work. Here’s an example of a “deep” saucer, which is the kind you need.
Stage 1: Drilling
Holes need to be drilled all over the place. First drill three holes in the bottom of the saucer unit.

These holes need to line up perfectly with 3 more holes on the bottom of the bucket. Flip the bucket upside down and rest the saucer on its bottom, now facing up. You can mark where to drill with a long, skinny pen or just drill right through, which is what I ended up doing.
Now we need a hole near the bottom of the bucket for feed to flow through. The largest drill bit I have is 1/2″ which isn’t nearly big enough, so I cut about a one inch round hole with an exacto knife. It is important to not cut the hole too high. I made the center of the hole roughly level with the top of the rim. It’s better to underestimate the size of the hole at first and cut away more as needed. If you have a hole saw (I want to buy this one but cannot get it shipped to Canada) you can very quickly drill a large perfectly circular hole where you need it.
I made only one hole at first, and another one later on the opposite side. Two holes in the bucket seemed to more than enough for 20 greedy chickens.

Stage 2: Bolting
Securing the saucer to the bucket is very easy, just thread the 3 bolts through the 3 holes and attach 3 nuts. I used some extra large nuts I had lying around as spacers between the bucket bottom and the saucer.
Stage 3: Testing
When I filled the bucket with feed for testing, it turned out my hole was still not big enough for the feed to flow smoothly. We use an organic feed that seems to have a lot of small particle sized pieces, which prevent it from flowing easily. I kept cutting away at the holes (cutting off below the saucer lip is preferable to cutting above) until I was satisfied with the feed flow.

Only after I found the right hole size for my feed did I make another hole on the back. If you prefer, you can keep cutting holes but I felt 2 was enough for the amount of chickens we have.
More 5 Gallon Bucket Chicken Care Equipment
If you’re building the 5 gallon bucket chicken feeder, you’ll also be interested in our other five gallon solutions to chicken care. Link: 5 gallon bucket chicken care posts.

 The “pot-in-pot” refrigerator dates back at least 5000 years. The principle is simple, a small pot is nested inside a larger pot, and sand is packed into the gap. The sand is kept moist at all times. When the moisture evaporates through the top (and more importantly through the sides) it cools the inner pot to a surprisingly cool 59ºF (15ºC) – cool enough to keep meat for two weeks (source)


