
Lard is a healthy fat, much underrated in the 21st century. It’s one of the few – if not the only – cooking fats you can create yourself at home with standard kitchen implements.
People who buy their pork by the half-pig render large volumes of lard all at once. But most people don’t buy pig by the wheelbarrow – they buy it a few pounds at a time from the grocery store or butcher. This small batch lard tutorial is aimed at regular people who collect pork fat bit by bit.

You can navigate this article quickly using the following menu.
Article Contents
Sourcing Pig Fat
Every time you buy pork, cut off the thick white slabs of fat and save them. Certain cuts will have more fat on them – I can get a full pound of fat from a single 15 pound shoulder roast. Save these pieces of fat in the freezer where they won’t go bad.
If you want lard sooner or in great quantity, try asking your local butcher. Sometimes you can get many pounds of fat free this way!
You should have at least one pound of pure pork fat before you start your first render.
Making the Lard

It’s best to chop the pork fat up into small 1/2″ cubes so it will render quicker. You need a low, even heat so a crock pot or cast iron pan works best.
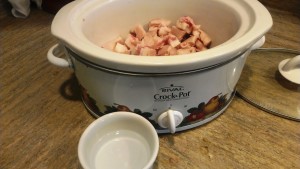
Having tried both crock pot and stove pot lard, I prefer the stove. My crock pot heats from the sides which tends to cause the fat chunks to cement themselves to the pot’s insides.(image below.)
Heating from the bottom as on the stove makes for easier clean-up and a much quicker render. However I’ve been informed that not all crock pots heat from the sides.

To prevent the cold fat from scorching, you’ll want a bit of water in the bottom of the pan. You don’t need much, just enough to cover the bottom. About 1/2 cup is plenty.
Turn on your stove or crock pot on the “low” setting and watch it carefully. To prevent scorching or sticking, stir your pork fat pieces regularly.
Once your lard mixture is approximately half liquid and half solid, you’ll want to start scooping off some of the hot liquid lard into another vessel. To keep the lard clean, filter it through a paper towel secured with a rubber band. I like to filter right into a mason jar. Push the paper towel into the mouth of the mason jar as far as possible to give the lard plenty of surface area to filter through, or else it will fill with gunk and stop filtering.


Continue to siphon and stir, until you’re left with little crispy pieces called cracklings. Your pork may finish rendering in just a couple hours, but it can take longer.

The above animation is from a recent batch of lard I rendered on the stove. I rendered out a full 2 cups of lard from this batch in a couple of hours. You’ll notice that the fat chunks don’t stick to sides as they did in the crock pot render above.
Eventually you will be left with toasted brown chunks called cracklings.
These hard pieces were once bits of meat and the tissues that held the fat together. But they aren’t a waste product – they’re delicious! At the base of this page we’ll go over how you can prepare and use these cracklings.
Using your Lard
Lard comes in two types – leaf and back. Leaf lard is pure white fat, unadulterated by any hint of porky taste. Pastry chefs bake fine cakes and strudels using this pure lard.
The lard you are most likely making is back lard. It’s the lard of the people. It’s got a pleasant savory flavor, and is still useful for almost everything.
Lard works in many recipes as a butter or oil substitute. As with any substitution, using lard will alter the taste or texture of your food slightly. For example, a donut fried in lard will come out slightly crispier than a donut fried in canola.
One of the most surprising uses for lard I have discovered is in bread. Instead of 1/4 cup olive oil, use 1/4 cup lard. The finished bread tastes identical, but lasts much longer before going stale! Somehow the lard preserves the bread for much longer than usual. If you already use the 1 minute bread machine recipe, try it with lard!
Preserving Lard
At first a cloudy yellow, your finished lard will turn a milky white as it cools and hardens.


Lard is pure fat, so it has a very long shelf life. Lard will last in a freezer for decades, for years in the fridge, and for months at room temperature.
Fill small mason jars, and keep them in the freezer. Take one out at a time to keep in the fridge or counter top.
Special Bonus: Cracklings!
After you’re done rendering your lard, you’re left with greasy, crispy chunks called cracklings. They’re a little bit like bacon. Most people have not heard of cracklings – but they’ve earned a small yet vocal fan base.

A quick bake in the oven will finish the cracklings off, getting the final drips of lard out and leaving them a crispy delicious snack. Heat an oven to 375 and bake them on a cookie sheet for just a little while. Check them every 5 minutes to make sure they don’t burn. The total baking time could be anywhere from 5 to 20 minutes, depending on how much lard is left in them.

Once they’re done, drain off the final sheen of lard. They’ll taste incredible with a sprinkling of salt as a finisher. Store them in a little container in the fridge and eat them fairly soon.
People sprinkle them on salads, bake them into cornbread or just munch on them as a high protein trail food.
I appreciate the information. I’ve been looking at options for storing fat long term and this may be the ticket plus the cracklings are an added bonus.
After lard, what are my uses for chicken fat??
Good question – I don’t think it preserves as well as pork fat. I actually use chicken fat immediately as an ingredient in gravy. You don’t want too much though because the broth can only emulsify so much chicken fat into it.
Simple gravy recipe:
If you want to preserve chicken fat for later I would just freeze it.
After my lard turns solid, I vaccum seal it with my Foodsaver.
Is it possible to can the lard so I do not have to freeze or refrigerate the lard? Thanks
Yes when we make bigger batches that’s what we do. You want to be sure you filter it very well. I think you want to use a pressure canner, look online for times.
Tallow can be made the same way as lard, but out of Beef Fat. the easiest way that i have found to make any sort of rendered fat is the just cook the meat without seasonings.
while cooking the meat, drain the fat off into a container and let it sit in the fridge overnight. the fat will rise to the top and a meat flavored gelatin and meat bits will sink to the bottom. pry the hardened fat out of the container and scrape off the gel. the gel can be used to add flavor to soups and stews, kinda like a bouillon cube.
the rendered tallow has a higher melting point than lard and holds it’s shape at room temperature, which made it a popular fuel for candles throughout history until bees wax was discovered for candle use.
Do you have any idea how long lard would last if you vacuum sealed it in mason jars instead of canning. I understand that may triple shelf life @ room temp. Canning may provide the longest shelf like, but I wondered about the vacuum sealed option.
Thanks,
Linda
Hi Linda,
The way you vacuum seal in a mason jar IS by canning it. But because it’s a meat product, technically it’s supposed to be processed at 250 degrees F. Since this is above boiling, it needs to be done in a pressure canner. However you CANT actually can lard at this temperature because the lard will “boil over” and ruin your seal and cause a huge mess in your canner. The best solution we have found is to just melt the lard, put the top on, and screw the rings down. Since the lard was hot to begin with, it “vacuum seals” as it cools – although there is no guarantee that the lard is safe unless it was brought to 250 F. You can bring lard up to this temperature on the stove but it’s dangerously hot and you don’t want to be anywhere near open flame. Home canners still disagree about the best way to can lard which is why many prefer to freeze it.
Thanks for the quick response. There is a way to vacuum seal without canning. You use the jar attachment that comes with the vacuum sealer. I’ve done it with many things to preserve shelf life, even in the freezer. Here’s a link to where you can
get one.
http://www.amazon.com/FoodSaver-T03-0023-01-Wide-Mouth-Jar-Sealer/dp/B00005TN7H
Linda
Very cool! I didn’t know something like that existed but I guess I shouldn’t have jumped to conclusions.
I imagine the biggest concern then would be home canning’s greatest nemesis, botulism, which thrives in an anaerobic environment. Does your vacuum sealer talk about how to avoid botulism?
No, can’t say that I recall anything about that. A few years ago I saw some You Tube videos on doing food storage, and the speaker mentioned using the jar sealer for things that were too high in fats or sugars, or too much moisture to seal w/ Oxygen Absorbers for long term storage, such as some nuts, dried fruit. Things that would normally keep for xxx amount of time @ room temp, but this triples that time. I was just supposing that the same thing could be applied to the lard. If it keeps at room temp for, say 3-6 months, then if vacuum sealed, it might keep 9-18 months. I’m trying to find if anyone has experience doing that, but I may just try it myself. I wonder, though, what the key is to knowing if it’s gone bad.
Linda